
Dollhouse chair pattern
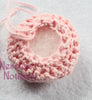
Dollhouse chair
This little project is something I have been thinking about making for a while. Lockdown level 4 in Aotearoa gave me a bit of extra time on hand to do something with my idea.
|
I have been using quite a bit of crochet cotton lately creating little dolls. Every time I finish a ball of crochet cotton I end up with a thick cardboard tube. I thought it might be fun to create some different things using the tubes. It is also a way for using up some of my scrap yarn tails (for stuffing) and uses a small amount of yarn (16 g of baby weight yarn in total or approximately 44 m, 48 yds). |
 |
|
During the summer holidays following my first year of university, I stayed with an aunt and uncle. While there, I made a few miniature pieces of furniture with my aunt mainly from cardboard, fabric, rickrack and glue. This little chair was inspired by one of the ones that I made with my aunt (original chair on the left, crochet version on the right). Of course, my little chair is a little too tall but I didn't want to cut the cardboard tube down so I left it full sized for this project. |
|

This pattern uses some of the stitches that I have already written about on my blog for increasing the circle in the first few rounds of the base and cushion patterns (the suzette stitch, the sedge stitch and the wattle stitch). These give a nice design instead of just plain single crochet. One of these stitches (the Suzette stitch) is used around the base of the chair to give a patterned look. It isn't quite the wicker look of the original chair that I made with my aunt but I still like the effect. The back of the chair uses crossed double crochet stitches to give a more open look and I soaked the back in a little PVA glue:water mix (1:1) to stiffen the back of the chair so that you can sit a doll in it. At this stage I have only made the pattern once and have not tested it so hopefully I haven't made any major mistakes in my write up.
Crochet Abbreviations
US terminology used
|
BLO |
Back loop only |
|
sc2tog |
Single crochet two together |
|
blsc |
Back loop single crochet |
|
sk |
Skip |
|
ch |
Chain |
|
sl st(s) |
Slip stitch |
|
dc |
Double crochet |
|
st/sts |
Stitch/stitches |
|
hdc |
Half double crochet |
|
WS |
Wrong side |
|
Rnd(s) |
Round(s) |
|
** |
Repeat instructions between asterisks the amount of times specified |
|
sc |
Single crochet |
|
|
|
Notions
2.25 mm hook
Baby weight yarn in your chosen colour(s). I used Moda vera gelato 4 ply yarn (50% acrylic, 50% cotton) for the main part of the chair 12 g (32 m, 35 yds) and Bella baby Tootgarook (100% cotton) 4 ply in pink for the cushion 4 g (12 m, 13 yds)
Yarn needle
Scissors
Cardboard tube 55 mm diameter, 45 mm length
Fibrefill or other suitable stuffing. I used a mixture of fibrefill with yarn tails leftover from other projects
Important instructions
The turning ch does not count as a stitch
When working in rounds, finish your round with a slip stitch, chain 1 and turn to work your next round in the opposite direction. You need to make sure your first stitch is in the last stitch of the previous round and not in the slip stitch or your rounds will not align and your stitch counts will not be correct. In Rnds 3-5 of the main stool part of the chair and the cushion you will need to skip to the last single crochet of the previous round to make your first stitch. You will also need to do the same thing for Rnds 7-14 or you will not get the pattern on the sides of your stool (you need to work back and forth as if in rows to create the Suzette stitch used for these latter rounds).
Where a round begins with “BLO” all stitches in that round are to be worked into the back loop only. In the next round all stitches will be worked in both loops again.
This chair was designed to fit the cardboard tube from inside a ball of Milford Soft crochet cotton. If you wish to use a smaller sized cardboard tube (eg from inside a roll of paper towels) you can cut the cardboard tube to the height you want and then crochet as many of Rnds 1-5 as you need to get a size that fits the top of your cardboard tube. Then work Rnds 5-6 with number of stitches you have in your previous round, crochet Rnds 7-14 until you cover the sides of your cardboard tube. For the last part, find the round in the last section with the same number of stitches that you ended up with and begin from the next round to the end of the pattern. This design would probably work without the cardboard tube in the middle, just with stuffing but might not be as sturdy as the version with the cardboard tube. However, if, like me, you choose to add something like PVA glue/water to strengthen the back of the chair then that might also firm up the base of the chair too.
Instructions
Base part of chair
With yarn in your chosen colour make a magic ring
|
Rnd 1 Sc 6 into the magic ring, sl st to the first st. Ch 1 and turn. (6 sc) |
 |
|
Rnd 2 (Sc, dc) in the first st, repeat in each st around, sl st to the first st to join. Ch 1 and turn. (6 dc, 6 sc) |
 |
|
Rnd 3 *Sk 1, (sc, ch 1, dc) in the next st* 6 times. Join to the first st with a sl st, ch 1 and turn. (6 ch, 6 dc, 6 sc)
|
 |
|
Rnd 4 *Sk 1, (sc, dc) in the ch 1 sp, (sc, dc) in the next st* 6 times, sl st to the first st. Ch 1 and turn. (12 dc, 12 sc)
|
 |
|
Rnd 5 Sk 1, (sc, hdc, dc) in the next st, sk 1, (sc, dc) in the next st* 6 times. Sl st in the first st, ch 1 and turn. (12 dc, 6 hdc, 12 sc)
|
 |
|
Your work should be approximately the right size to cover the top of your cardboard tube. |
 |
|
Rnd 6 Sc in each st around, join to the first st with a sl st. Ch 1 and turn. (30 sc)
|
 |
|
Rnd 7 Working in BLO, sc in each st around, join to the first st with a sl st. Ch 1 and turn. (30 sc)
|
 |
|
Your work should now fit snuggly over the sides of your cardboard tube. Make as many of Rnds 8-14 as you need to get to the bottom of your tube. |
 |
|
Rnd 8 *(Sc, dc) in the first st, sk 1* 15 times, join to the first st with a sl st, ch 1 and turn. (15 dc, 15 sc)
|
 |
|
Rnds 9-14 *Sk 1, (sc, dc) in the next st* 15 times. Join to the first st with a sl st, ch 1 and turn. (15 dc, 15 sc)
Your work should now cover the sides of your cardboard tube.
|
 
|
|
Rnd 15 Sc in each st around, join to the first st with a sl st, ch 1 and turn. (30 sc)
|
 |
|
Note: if you have used a different number of rounds to this point you may need to work this round in FLO instead of BLO (you want it to start folding over your tube) Rnd 16 Working in BLO, blsc in each st around. Join to the first st with a sl st, ch 1 and turn. (30 sc)
Stuff your cardboard tube. I started with a bit of fibrefill to disguise any darker yarn tails and then added in lots of yarn scraps from previous projects. |
 
|
|
Rnd 17 *Sc2tog, sc in the next 3 sts* 6 times. Join to the first st with a sl st, ch 1 and turn. (24 sc)
|
 |
|
Rnd 18 *Sc2tog, sc in the next 2 sts* 6 times. Join to the first st with a sl st, ch 1 and turn. (18 sc) |
 |
|
Rnd 19 *Sc2tog, sc in the next st* 6 times. Join to the first st with a sl st, ch 1 and turn. (12 sc) |
 |
|
Rnd 20 Sc2tog 6 times. Join to the first st with a sl st, ch 1. Fasten off and weave in your tail. (6 sc) |
 |
Back of chair
|
Row 1 With WS facing and a slip knot of MC yarn on your hook, make a standing sc in any unworked loop from Rnd 6 of the chair base, sc in the next 15 sts, ch 1 and turn. (16 sc)
|
 |
|
Rows 2- 7 Hdc in the first st, *sk 1, dc in the next st, dc in the sk st* 7 times, hdc in the last st, ch 1 and turn. (14 dc, 2 hdc) |
|
|
Row 8 Hdc2tog, crossed dc st 6 times, hdc2tog, ch 1 and turn. (12 dc, 2 hdc) |
 |
|
Row 9 Hdc2tog, crossed dc st 5 times, hdc2tog, ch 1 and turn. (10 dc, 2 hdc) |
|
|
Row 10 Hdc2tog, crossed dc st 4 times, hdc2tog, ch 1 and turn. (8 dc, 2 hdc) Fasten off and weave in the ends. |
|
|
The finished back of the chair is a little floppy. If you wish to, you can starch it or use a 50:50 mixture of PVA glue:water to give a firm back to your chair. |
|


Cushion for chair (optional)
|
Rnds 1-5 Repeat Rnds 1-5 for the stool part of the chair.
|
 |
|
Rnd 6 Working in BLO, sc in each st around, join to the first st with a sl st, ch 1 and turn. (30 sc) |
 |
|
Rnd 7 *Sc2tog, sc in the next 3 sts* 6 times, join to the first st with a sl st, ch 1 and turn. (24 sc) |
 |
|
Rnd 8 *Sc2tog, sc in the next 2 sts* 6 times, join to the first st with a sl st, ch 1 and turn. (18 sc) |
 |
|
Rnd 9 *Sc2tog, sc in the st* 6 times, join to the first st with a sl st, ch 1 and turn. (12 sc) Lightly stuff the cushion |
|
|
Rnd 10 Sc2tog 6 times, sl st to the first st, fasten off and weave in the ends. (6 sc)
|
 |
|
Optional trim for cushion With a sl knot of yarn on your hook, make a standing sc in any unworked loop from Rnd 5. (Ch 1, sc) in the same st. *Sl st in the next st, (sc, ch 2, sc) in the next st* 14 times. Sl st in the next st, sl st to the first st. Fasten off and weave in the ends. (30 ch, 30 sc, 15 sl st)
|
|


Copyright Information
This is a free pattern, and by using it, you’re agreeing to the following legally-protected conditions.
You’re welcome to sell what you make with it; for online listings, please link back to my website: http://www. NessiesNotions.com
Pattern by Jenness Fulton of Nessie’s Notions
Here are the “do nots”:
- Do not resell the pattern, altered or in its original form.
- Do not copy and paste the pattern onto your own blog, in a Facebook group, or anywhere else. Simply link to my website instead. Anything beyond this is copyright theft, regardless of what your pattern-sharing buddies tell you.
- Do not pull any of my photos or photos from this pattern to promote yourself or your crochet business on your own blog, Facebook page, or anywhere else. Do not post a translation of the pattern anywhere – this is copyright theft.